Overview
What Is Sitepins?
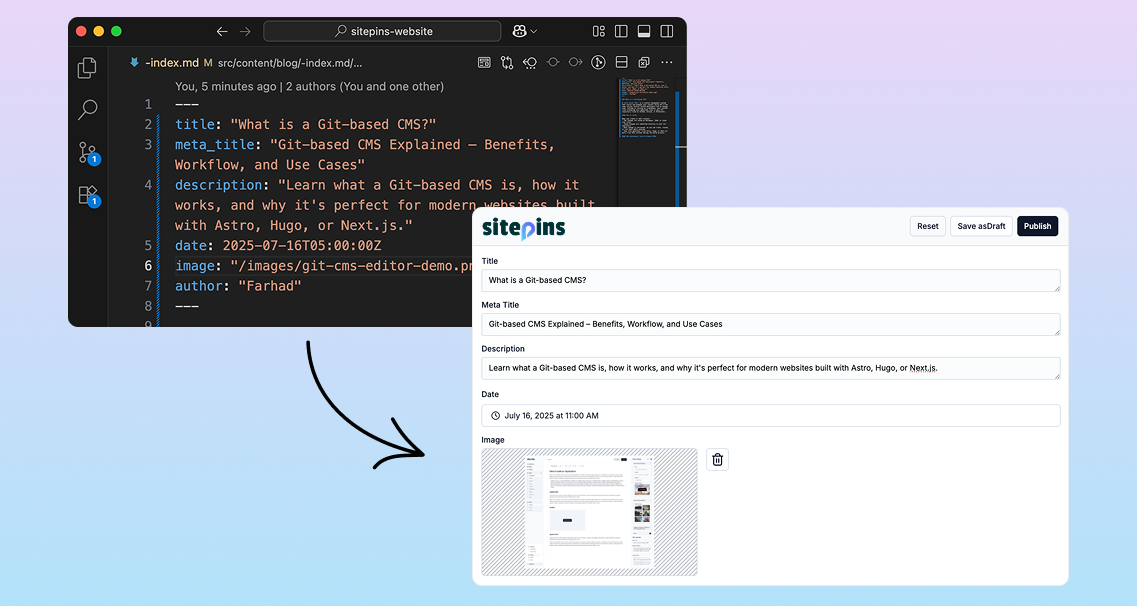
Section titled “What Is Sitepins?”Sitepins is a Git-based content editor built specifically for static site generators like Astro, Hugo, Next.js, Eleventy, and others. It gives your team a visual interface for managing content.
Unlike traditional CMSs, Sitepins doesn’t host or render your site. It doesn’t generate layouts or dictate structure. Instead, it:
- Reads your existing content files (Markdown, JSON, YAML, TOML) from your Git repository
- Overlays a visual editor that lets you manage that content without touching code
The content stays in your codebase. Sitepins just adds a user-friendly editing layer on top — ideal for marketers, writers, or anyone who prefers not to use a code editor.
No configuration is needed. Just connect your repo, pick your content and media folders, and start editing.
Key Features
Section titled “Key Features”Sitepins is built for content teams and developers who want visual editing with full control over their codebase.
Developer-Friendly
Section titled “Developer-Friendly”-
Git-Integrated Workflow
Every change is committed to your Git repository. Changes are versioned, reviewable, and reversible. -
Supports All Major SSGs
Works with Astro, Next.js, Hugo, Eleventy, Jekyll, Nuxt, and more. -
Flexible Content Formats
Native support for Markdown, JSON, YAML, and TOML. -
Support for Shortcodes
Use dynamic shortcodes and nested structures to build modular, reusable content blocks. -
Zero Configuration Required
No manual schemas creation needed. Just connect your repo and pick your content folders.
Editor Experience
Section titled “Editor Experience”-
Visual + Markdown Editing
Choose between a clean visual editor or classic Markdown mode. -
Drag-and-Drop Media Library
Upload, organize, and reuse media assets in folders. -
Built-in AI Assistant
Connect your own OpenAI API key and unlock content generation, rewriting, and enhancement directly inside the CMS.
Team Collaboration
Section titled “Team Collaboration”- Role-Based Access Control
Assign custom roles and permissions to manage who can edit, commit, or publish.
Now that you know what Sitepins is and how it works, you’re ready to set it up. Next, we’ll guide you through how to connect Sitepins to your GitHub repository, select your content folders, and start editing visually — all in just a few steps.